Before getting into the tutorial lets sketch a rough outline of the concept we are going to create. In this scene a master wizard will be teaching his student witch about how to create monster tornados and huge whirlpool at the same time. In the mean while he creates dark energy balls to protect themselves if anything goes out of control
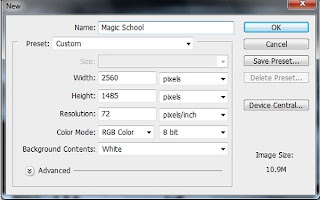
Create a new canvas in Photoshop with the resolution of Width=2560px and Height=1485px
Create a new canvas in Photoshop with the resolution of Width=2560px and Height=1485px
Since the characters are in contrast with the background, mask out only the characters leaving the stick in between them using the Magic Wand Tool(W) and import them on to the working canvas
To create a dull and rainy environment in the scene, import the image with thick grey sky and place it on the canvas as shown
To make the scene more intense we need to create much more thick clouds. So import the clouds image and place it above the 'rainy clouds' layer
To match the blue clouds to the scene, we need to desaturate the 'clouds 2' layer. With the 'clouds 2' layer selected Desaturate it to -61 using Hue/Saturation (Image > Adjustments > Hue/Saturation)
Since we need only the clouds, using the Soft Eraser (E) erase the base of 'clouds 2' layer as shown
Now import the image of the river that we are going to manipulate into an ocean in the scene. Make sure to place it on the 'clouds 2' layer
Erase the sky from the 'ocean water' layer using the Eraser Tool(E)
In this step we will be creating distant hills. In the below reference image you can observe how the hills are fading with the increase in distance
Hence to create the same natural depth in our scene, import the image of the hills that suites perfectly to our scene and place it on the canvas as shown.
Now mask out the sky leaving only the hills. Then desaturate the hills and water color to -61 using Hue/Saturation
Now by using the Stamp Tool (S) clone the stick in the 'ocean' layer that is creating a distraction
Since we are creating a stormy environment, we need to create water splashing against the rock on which our characters are standing. Import the water splash image into Photoshop and select the Red layer from the Channels pallet
Then select Calculations (Image>Calculations) and select Red from the Channels dropdown list
Once the Calculation is checked OK an Alpha 1 layer will be created in the channels pallet. With the 'Alpha 1' layer selected set the Levels as shown to create maximum contrast between the water splash and the background that are to be separated
Now go to 'Select>Load Selection' and select Alpha 1 from the Channel dropdown list and check OK to create mask around the splash
Now go to 'Select>Load Selection' and select Alpha 1 from the Channel dropdown list and check OK to create mask around the splash
so we can see :


 areyis


 Posted in:


0 comments:
Post a Comment