Monday, August 29, 2011

Art Fragmentation of the Photo with photoshop

Start by opening photo on Photoshop.

From this photo choose one of the girls. I choose the one in the middle and use the Crop Tool to select area. After selection, go to Image > Crop.

Create Comic Strip Effect in Photoshop

Start by opening photo in Photoshop. Resize image to 669px width and 1000px height by going to Image > Image Size.

The picture should be black & white. Go to Image > Adjustments > Desaturate to convert color picture to monochrome.

Creating a Smoke Shaped Image in Photoshop

Start by downloading all photos that we will need for this tutorial. Open photos in Photoshop. Copy smoke 1 photo to portrait canvas and position smoke photo like i did below.

Saturday, August 27, 2011

Alien-Entity Text Effect in photoshop

First thing’s first, create a new document in which you can make your text, use a size of about 400 x 200 pixels. Now make a background that will suit the theme. I started the background by first making a few white gradients on a black background.

Elegant Leather Style Text Effect in photoshop


First of all, using Google search find some appropriate image to create the texture from it. I prefer to use this one. Also feel free to use your own pictures. Now create a new document sized 1000×500 pixels and bring out picture into it.

Delicate Text Effect in photoshop


First of all, make a new document in Photoshop. I created a new document sized 1000×500 pixels with all the default settings, RGB, 72 dpi, white background etc.

Smoked Text Effect in photoshop

final picture

For the beginning lets create a new document with the size of 1000×500 pixels and fill it with some colour, for example, white.

Cool Unusual Text Effect in photoshop


Start by creating a new document to make this text effect. I created a small document sized 500×300 pixels and fill it with color of #74a103:

Friday, August 26, 2011

Fabric Text Effect


Created a new document sized 1000×500 pixels with all the default settings, RGB, 72 dpi, transparent background etc. Then find some appropriate fabric texture. Actually, you can use Google Images to find the texture or feel free to use mine. Open up the texture and copy it to the canvas.

Modern Designed Text Effect


First of all, make a new document in Photoshop. I created a new document sized 1000×500 pixels with all the default settings, RGB, 72 dpi and fill it with gradient by using colors of #8f9290, #303231 and #8f9290.

Text on Fire


First of all you’ll have to start by finding some appropriate picture. I prefer to use this one which you can see below:

Luxury Golden Text Effect


Created a new document sized 800×400 pixels. Then select some appropriate colors, for example colors of #161515, #71777b and drag a linear gradient.

Learn to Create Stuffed Text Effect


Create a new document, 1024x768px, set foreground color to #6e3f68 and background color to #261e25. Then create a radial gradient from the center of the document to one of the corners.

Wednesday, August 24, 2011

Creating Text Decoration by Mixing Two Styles


You should begin from creating a new document about 1000×500 pixels and fill it with white color.
After that use the Horizontal Type Tool and write out some text with color of #0d848b. Also you have to set up following presets for current text line:

Creating Cardiac Rate Effect with Photoshop


Create a new document with size of 700×700 pixels for this tutorial. Select the Paint Bucket Tool and fill canvas with black color (#000000).

Tuesday, August 23, 2011

Create Space Style Text Effect


Create a new document that is 1350 x 1000 px. Set the Foreground color to #4ea6d0, and the Background color to #195081. Create a Radial Gradient from the center of the document to one of it corners.

Learn to Create Marble Text Effect


Fill the Background with the color #534d39. Place Marble Stone Texture Stock on top of the Background, and change its Blend Mode to Multiply.

Learn to Create Party Text Effect


Create a new document that is 1350 x 1000 px. Set the Foreground color to #525252, and the Background color to #0d0d0d. Create a Radial Gradient from the center of the document to one of it corners making sure that you selected Foreground to Background gradient preset.

Make Quick & Easy Colour Palettes

This short Photoshop tutorial will show you an easy and effective way of making colour palettes.
Let’s start by making a new document in Photoshop. You can use whatever size you want, something fairly small though, preferably. I used a document size of 210 x 360 pixels.
Leave your background color as white (#ffffff).

Universal Icon for Different Colors of Background

Start by creating a new document with 600×400 pixels. Fill layer with any background color you would like. In my case i used color #b90010.

Creating Focus on the Photo with photoshop

Open japanese dish photo and let´s start our tutorial.

Now we need to decide where we want to put the focus. Let it be dish area. Get out the Elliptical Marquee Tool and create selection similar to the selection on my picture below.

Evening Eye Make Up Effect in Photoshop

Start by finding some appropriate picture of girl face. You can also use your own photos to experiment with, if you girl of course. Open up the photo and start to work with it.
makeup-01

Creating Focus on the Photo by Using Blur Map

Start by opening photo on Photoshop. Now we are going to create a special blur map to focus attention on the object. To do that start by selecting foreground color as black (#000000).
Creating Focus on the Photo by Using Blur Map 1

Learn to Create Beautifull Lines of Different Shapes


Open Guitar Silhouette image on Photoshop. Go to Image > Image Size and change width to 1125px and height to 1500px.

Wednesday, August 17, 2011

How to Make Anime - Miu Miu Anime Girl

In this tutorial we'll see one of the methods to represent a picture in anime style, learn representing accurate contours, change the colors, use different layers and some program's filters.
Open in a new window the already scanned picture: File ? Open (ctrl+o).

How to create anime in Photoshop - shining ambience

Select and prepare your brushes, then create your backgrounds and stock images.  

For the background, fill the background with black. Then, using those brushes and create the following two

how to draw anime in photoshop - ripple effect

 Choose a picture.

 Create a new file.

Create a new layer, and put the picture in the layer.

Create a new layer, use ellipse tool to draw as following picture.
Ellipse tool

Tuesday, August 16, 2011

Custom Shapes As Text Frames In Photoshop


Select Photoshop's Custom Shape Tool from the Tools panel. By default, it's hiding behind the Rectangle Tool, so click on the Rectangle Tool's icon and hold your mouse button down for a second or two until a fly-out menu appears showing a list of the other tools available in that spot, then select the Custom Shape Tool 

Creating Repeating Patterns From Custom Shapes In Photoshop


As we learned back at the beginning of this series, the first thing we need to do is design a single tile which will become our repeating pattern. For that, we need a new blank document, so go up to the File menu in the Menu Bar along the top of the screen and choose New:

Combining Text With Shapes In Photoshop

In this Photoshop Basics tutorial, we'll learn how to create fun designs and interesting logos by combining text with custom shapes! First we'll learn how to convert the text itself into a shape

disinteregration effect in photoshop


First of all, go to file and then hit new to create a new canvas (Ctrl+N) . This new canvas will be the background layer in the layers palette

Photoshop Layers - The Background Layer


Here's an image of a photo frame that I've just opened in Photoshop. The image is available from the Fotolia image library:

Open Multiple Images As Photoshop Layers


Begin by opening Adobe Bridge and navigate to the folder that contains the images you want to add to your document. Here, I have Bridge open to a folder on my Desktop with three photos inside of it. I'll select the first image (the one on the left) by clicking on its thumbnail:

How to Create a Retro Surreal Photo Manipulation using Photoshop


Create a new image file, go to the Menu bar and click File > New, and then input the following values on their respective fields:
Width: 3000px 
Height: 3000px 
Resolution: 300pixels/inch 
Color Mode: RGB Color; 8 bit 
Background Contents: Transparent 

Monday, August 15, 2011

Create amazing and colorful desktop wallpaper with Dandelion


Creating a new file (File>New) of 1920×1200 px and 72 dpi.Apply the Paint Bucket Tool (G) to give the file black color. 

How to stylise model shoot using colourful shapes in Photoshop


Creating a new document (Ctrl+N) in Adobe Photoshop with the size 1280px by 1024px (RGB color mode) at a resolution of 72 pixels/inch. Use the Paint Bucket Tool (G) to fill with black color the new background layer

Saturday, August 13, 2011

How to make Simple Abstract Shining Wave Line in Photoshop


Create a new document sized 470px * 330px, fill the background with black color. Create a new layer called “baseline” and grab a big white brush with 0% hardness, do a single-click on this new layer:

Simple Glowing Floral Pattern Creation in Photoshop


Create a new document sized 600px * 600px, fill the background with black colour. Create a new layer called “Cloud” with around 40% opacity, use the cloud brush you downloaded, and paint some cloud onto it:

Create Realistic Rain in Photoshop


Create a new document  fill the background with black colour. Create a new layer and grab a 1px, hard round brush:

Create Lifestream Abstract Design in Photoshop


Create a new document with black background, size doesn’t really matter in this tutorial. Press the “P” key to select the Pen Tool, draw a work path as shown below:

abstract effect text with photoshop

Create a new document (size doesn’t really matter) with light grey background, create a new layer and use a big soft white brush to paint a spot light from the top:
undefined
Load the crack brush into Photoshop, paint some crack pattern around the canvas (with a white colour brush) as shown below:

Create Abstract Photo Manipulation with 3D Render Pack in Photoshop

Create a new document sized 700px * 1020px with the default white background. Load the Wall Texture image into Photoshop and use the Rectangular Marquee tool to select a portion of the image as shown below:

Create a Vibrant Abstract Vector Design Illustrator

Follow this step by step Illustrator tutorial to create a vibrant abstract design. We’ll put Illustrator’s Gradient Mesh tool to use to create a colourful shape, then build up layers of objects to create an abstract design with lots of vibrancy, bright colours and transparency effects.
Abstract Vector Design

How To Create a Cool Abstract Radial Pattern Design


The design we’ll be creating this time makes use of a radial pattern that draws in the viewer to the centre. Alternating colours give the design a cool and funky feel and textures add a touch of authenticity to the artwork.

How To Create a Colorful Logo Style Ribbon Graphic

In today’s tutorial we’re going to look at creating a colorful ribbon graphic. Despite being a typical logo style icon, we don’t have a live client for this particular design. The tutorial is aimed towards giving you insight into actually making the cool graphic as oppsed to the full logo design process. We’ll use various tools and techniques in Adobe Illustrator to create a great looking vector based design complete with subtle gradients and shading.
Ribbon style logo

skateboard descks create model with photoshop

There’s something about designing for unusual applications such as skateboard decks that really makes the design process much more fun. Maybe it’s the unique canvas size that makes things a little more challenging, or just the cool feeling you get when you see it mocked up as a complete deck. Follow this step by step Illustrator tutorial to create a vector patterned deck design with a minimal colour scheme.
Vector patterned skate deck design
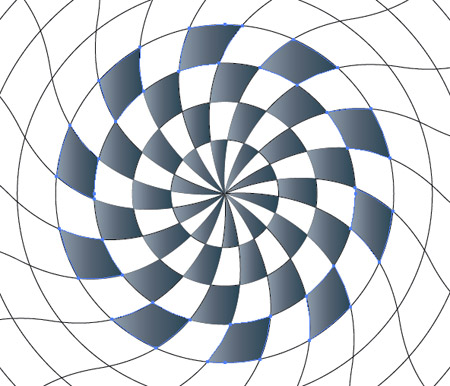
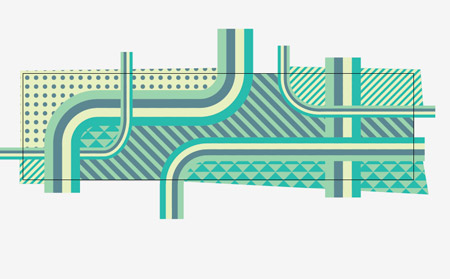
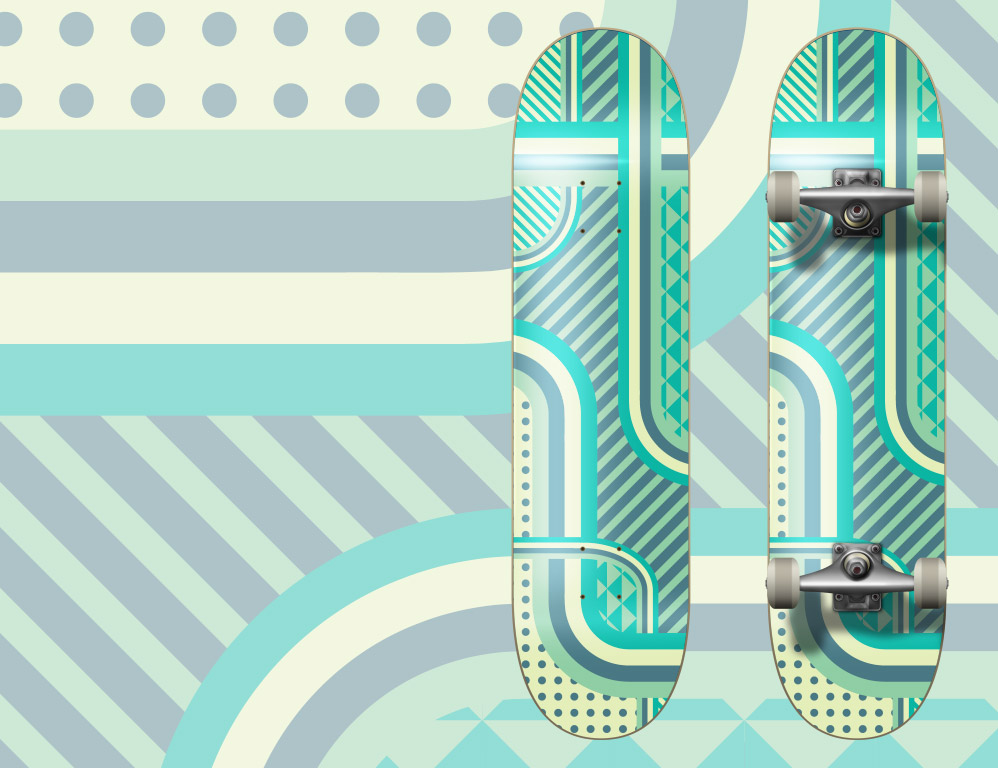
The deck design we’ll be creating is made us of various vector elements to produce a layout with a range of patterns. The minimal colour scheme of blues and greens gives quite a retro feeling and overall makes for a pretty cool skateboard deck artwork.
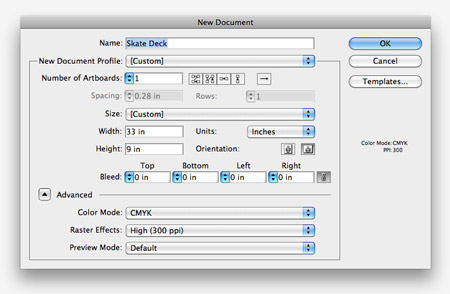
Create a new document in Adobe Illustrator. We’ll need dimensions of around 33x9inches for a typical skateboard deck, but the great thing about vector artwork is we can always scale it to fit any specific sizes later down the line.
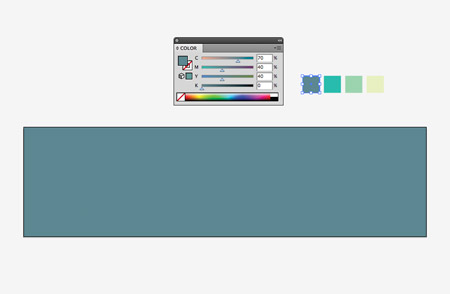
Set out a colour scheme for your deck design. This particular scheme is one I picked out from ColourLovers, named I demand a pancake. Fill the whole artboard with a solid filled rectangle.
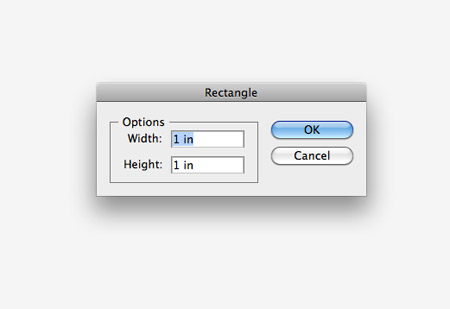
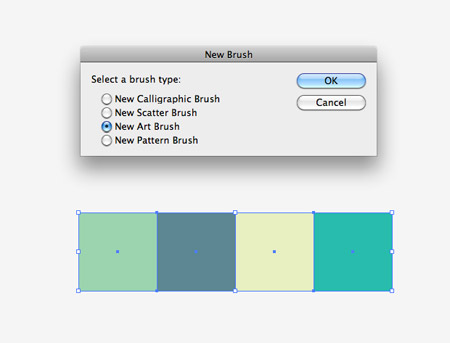
Single click somewhere on the artboard with the rectangle tool active to open up the options box. Create a square at 1x1inches in size.
Give the square a fill from the colour palette, then hit the Enter key to bring up the Move options. Enter 1 inch horizontally then click the Copy button.
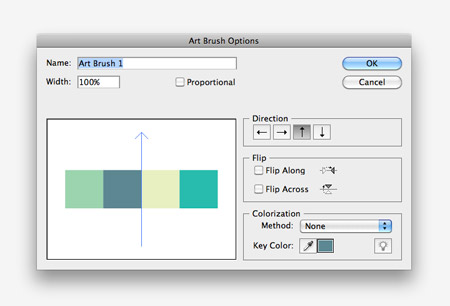
Repeatedly press the CMD+D shortcut to repeat the transformation, then replace the colours of each square to fit the colour scheme. Select all the squares then add them as a ‘new’ Art Brush by clicking the new icon at the bottom of the Brushes palette.
Make sure the direction of the brush is flowing vertically to allow the brush to create a striped effect when added to a path.
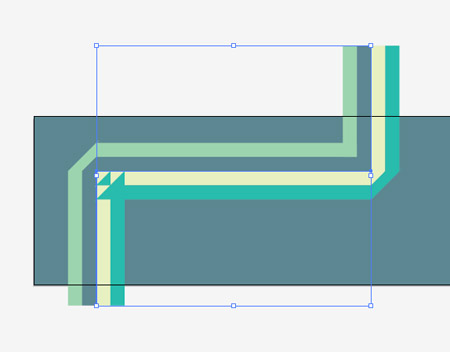
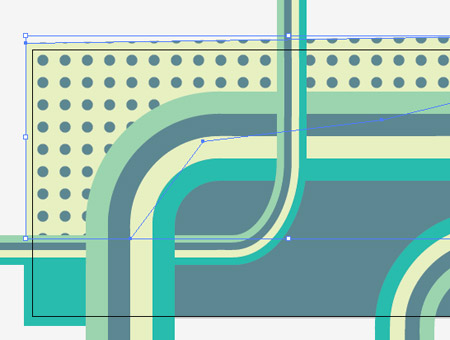
Use the Pen tool to draw a path across the artboard. Hold Shift to keep the lines straight to provide 90 degree angles. The striped brush will glitch at the corners but we’ll fix this next.
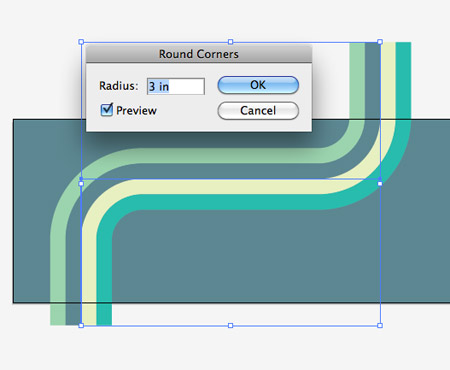
With the path selected go to Effect > Stylize > Round Corners. Adjust the radius until you have nice smooth flowing stripes with no kinks.
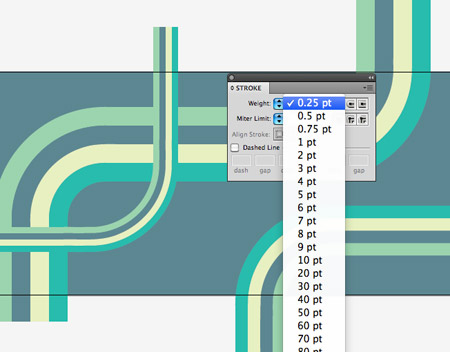
Draw a couple more striped lines across the design, overlapping lines with others. Change the stroke weight to 0.5pt and 0.25pt to create different sizes lines.
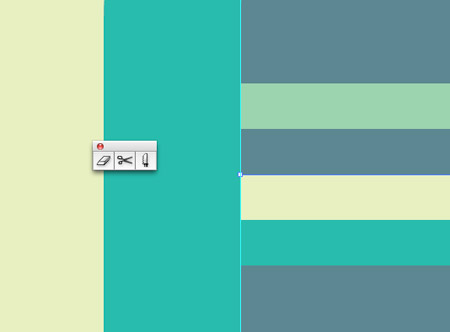
On any path that crosses another in two places, use the scissors tool to split the path and delete out the overlap to give the appearance of two lines weaved over and under the other.
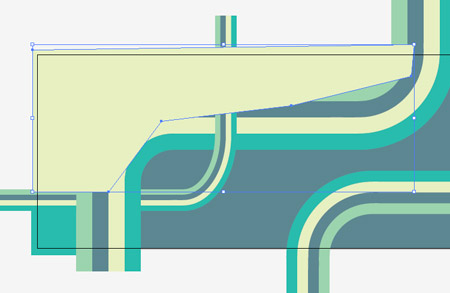
The overall deck design is now split into a number of different regions. Use the Pen tool to roughly outline these regions in different colours. Use the shortcut CMD+Shift+[ to send the fills to the bottom of the stack, then press CMD+] to bring them up a level above the large blue background. The rough outlines will then be hidden by the striped paths.
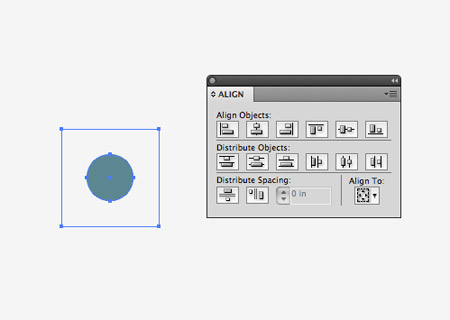
Elsewhere on the artboard draw a blue filled circle, then align a clear square with no stroke or fill centrally using the Align palette. Drag these shapes into the swatches palette.
Copy (CMD+C) and paste in front (CMD+F) a duplicate of the yellow region, then replace the fill with the circle/square swatch to create a cool dotted pattern fill.
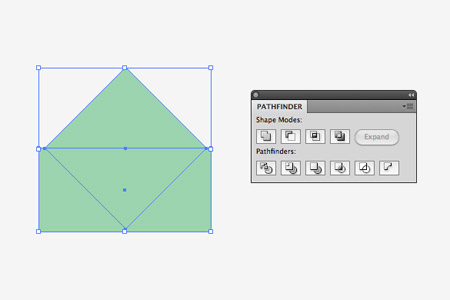
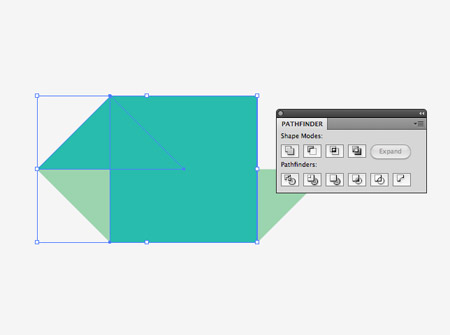
Draw and rotate a square to 45 degrees somewhere on the artboard. Carefully add another rectangle to cover the lower half, then use the Divide option from the Pathfinder palette to split the crossing paths. Ungroup then delete out the excess, leaving two triangle shapes.
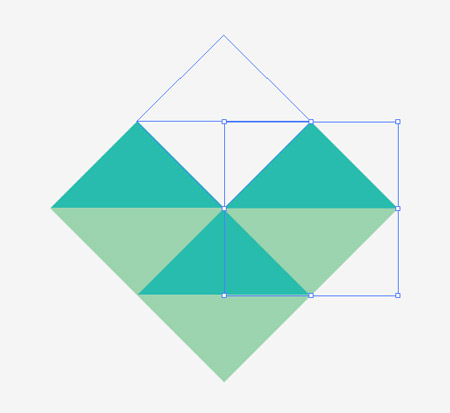
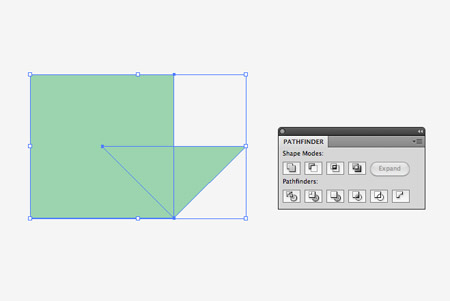
Replace the fill colour of the upper triangle, then duplicate copies of the shapes and move them into place to create a tessellating pattern. Use CMD+Y to enter outline mode to carefully align them all.
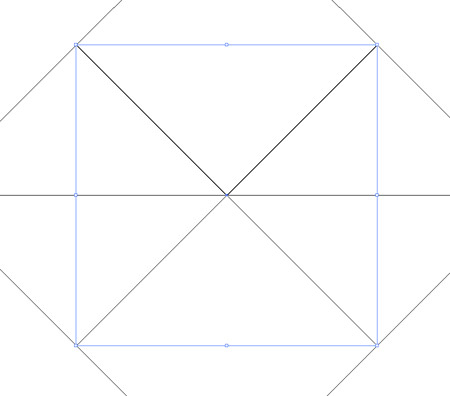
Zoom right in and align a square to the centre of the pattern. Use outline mode to align the corners perfectly to the existing points.
Make a copy of the square, then use it along with the Intersect option from the Pathfinder palette to clip down each triangle. Press CMD+F to paste in another square for use with the next shape.
Remember to change the colour of the square when using it on the final two triangles, as the pathfinder tool converts the clipped shape to the colour of the shape that is being used as a tool.
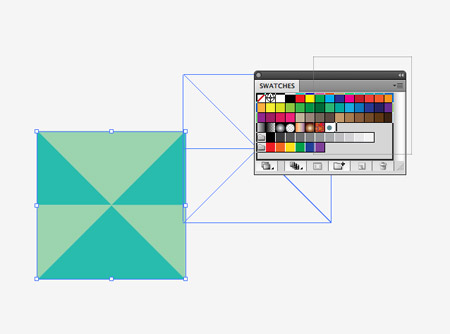
Drag this series of shapes into the swatches palette to create a new pattern swatch.
Add this swatch fill to one of the regions of the design to create a cool retro style tessellating pattern.
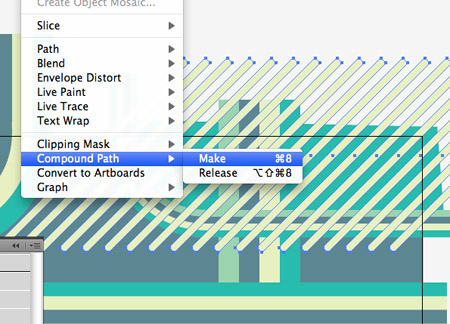
For one of the other regions, draw a long thin rectangle and rotate it to 45 degrees. Hold ALT and Shift while dragging out a duplicate, then hit CMD+D repeatedly to create a series of lines.
Select all the lines and create a Compound Path by going to Object > Compound Path > Make, or hitting CMD+8.
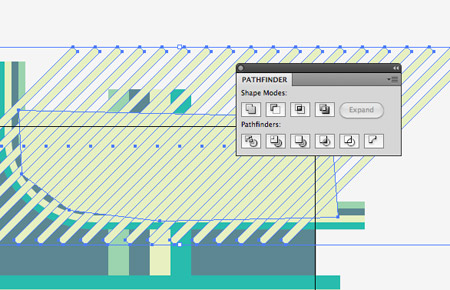
Make a copy of the fill for this region and send it to the top (CMD+Shift+]). Select both items and hit the Intersect option from the Pathfinder palette to clip the lines to size.
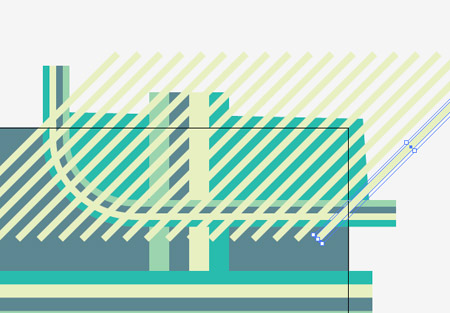
Draw another series of diagonal lines, this time in the opposite direction and flowing across the whole design. Use the deck background rectangle as a tool this time to clip down the rectangles. Press CMD+[ to send them below the other objects to sit above the background.
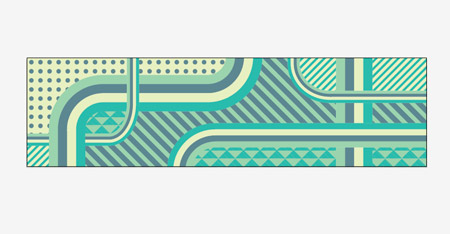
Our abstract design of various pattern files is just about complete. Now let’s tidy up the document and mock up the design as a skateboard deck.
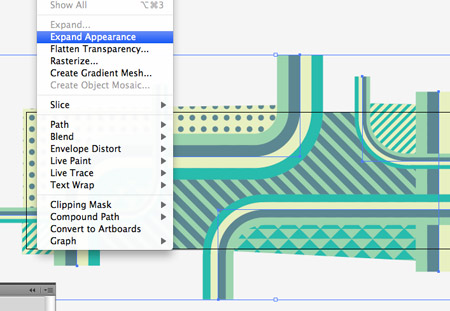
Select the series of striped paths and go to Object > Expand Appearance to convert them to solid shapes.
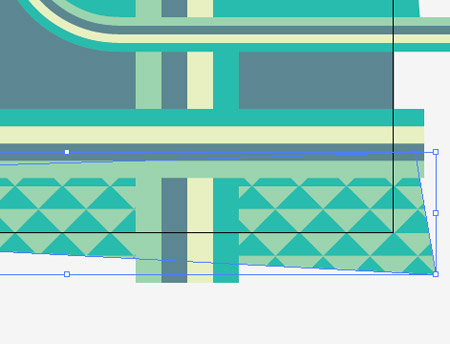
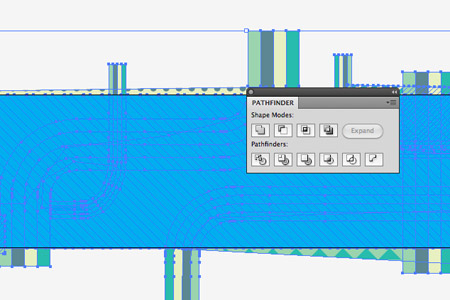
Group all the elements of the design together then draw a temporary shapes matching the size of the artboard. Select this along with the design and hit the Crop button from the Pathfinder palette.
The design elements are now neatly trimmed to the edges of the artboard and the design itself is ready to be exported as an EPS, PDF, TIFF or even PNG file.
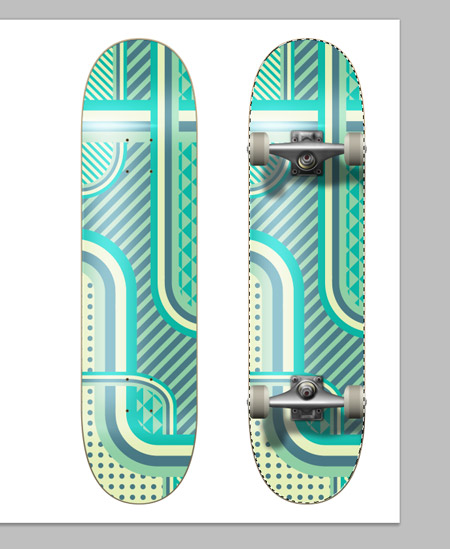
To gain a preview of how our design will look, we can use the cool skateboard deck template from Nunosk8. Paste a copy of the design into the Photoshop document and trim it to size.
Vector patterned skate deck design
Our abstract, patterned and pretty retro looking design looks super cool when mocked up on the skateboard deck template. The limited colour palette of blues and greens helps balance the design by making sure no particular area stands out more than another.

 
Design by Free WordPress Themes | Bloggerized by Lasantha - Premium Blogger Themes | Hot Sonakshi Sinha, Car Price in India