

 areyis

Start by downloading all photos that we will need for this tutorial. Open photos in Photoshop. Copy smoke 1 photo to portrait canvas and position smoke photo like i did below.

Desaturate smoke image by selecting smoke layer and going to Image > Adjustments > Desaturate (Shift+Ctrl+U).
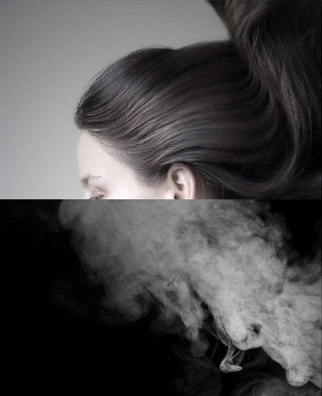
Set layer opacity for this layer to 70%.

Rotate smoke by going to Edit > Transform > Rotate.

Copy smoke 2 to our main canvas.

Repeat same actions with this smoke layer like you did with first one: desaturate it and set layer opacity to 70%.

Finally rotate this layer a bit by using Edit > Transform > Rotate.

Apply Edit > Transform > Warp to replicate face shape.

Regarding face, try to shape it as similar as possible.

Select Smudge Tool with soft-edged brush (Strength: 50%) to improve contour.

In the end we should have something like this:

In order to depict the photo exactly, we should use several images of smoke as a rule. In this tutorial I used only three images of smoke. As layers will overlay each other sometimes, it’s worth using the Eraser Tool to remove unnecessary parts from the layers (always select soft-edged brush). On this step it’s also worth clearing the upper edge of the layer we’ve just worked with, as this edge overlays the lower layer.

Go to third smoke image and select part of the smoke using Polygonal Lasso Tool.

Copy selected area to the main canvas and place it as shown on screenshot below.

Desaturate this layer by going to Image > Adjustments > Desaturate (Shift+Ctrl+U) and set layer opacity for this layer to 70%. Then move it to the right edge of the canvas.

Select Eraser Tool with soft-edged brush and erase edges on this layer.

Update all layers opacity back to 100%.

Create a new layer right above background layer with portrait. Fill it with black color (#000000).

Merge all layers except background layer (portrait) by selecting layers and pressing Ctrl+E. We now have only two layers: portrait layer and smoke layer. Set layer opacity of smore layer to 50-70% and adjust contour by using Smudge Tool.

Go back to third smoke image. Make a new selection of smoke using Polygonal Lasso Tool.

Copy selection to main canvas.

Desaturate this layer by and going to Image > Adjustments > Desaturate (Shift+Ctrl+U) and set layer opacity for this layer to 70%. Transform it by using Ctrl+T and position selection like i did.

Edit layer edges using Eraser Tool.

Set layer opacity back to 100%.

Merge all layers except background layer with portrait. Right now looking at image it seems girl has one too long neck. We can fix this by adding more smoke. Repeat same process we did before (select from smoke 3 a bit of smoke, copy it to our main canvas, desaturate and reduce layer opacity so you can clear edges of layer. In the end you should have something like i have below.

Once you are happy with result, merge all layers except background layer with portrait. We have only two layers: portrait layer and smoke layer.
With smoke layer selected, apply Image > Adjustments > Hue/Saturation.


Duplicate layer with portrait using Ctrl+J and place it above smoke layer. Select the violin using the Polygonal Lasso Tool.

Invert selection using Select > Inverse and remove everything inside the selection by using Delete button.

Make a new selection in the shape of violin using Polygonal Lasso Tool and remove unnecessary background using Delete button again. Deselect selection using Ctrl+D.

If you still have some problem areas with the remains of the background, they can be erased by using Eraser Tool with a soft-edged brush and opacity set to 30-50%.

Duplicate layer with violin using Ctrl+J and apply Image > Adjustments > Hue/Saturation.
Change layer blending mode to Soft Light for this layer and this tutorial is now complete.


Final Image


 Posted in: about photoshop,advance tutorials,andesta blog,CS 3,CS 4,photo effect,Photoshop,photoshop tutorials


0 comments:
Post a Comment