

 areyis


Create a new image file, go to the Menu bar and click File > New, and then input the following values on their respective fields:
Width: 3000px
Height: 3000px
Resolution: 300pixels/inch
Color Mode: RGB Color; 8 bit

In this step, we will be creating the sea which is the foreground of our picture. To start, open the image “36 underwater stock” by winkstock. Once you have it open, simply activate the Move tool (V) and drag it to our canvas. See the images below:

Once done, rename this layer to “water”. To rename a layer, simply double-click on the words: “layer 1” (that is our sea image) to prompt a text box to appear. Once that appears, you may now rename the layer.

Resize this image. To resize it, activate the Transform tool by pressing Ctrl/Cmd + T. Follow the instructions on the image below:

The result should be similar to this:

Make the viewer feel that he/she is seeing both underwater and above-water. To start, activate the Polygonal Lasso tool by pressing L on your keyboard.

Once you’ve done that, follow the instructions below:

The result should be similar to the following:

After doing that we would have to make this cut look seamless, so we would need to blur the edge of this sea. To do that, activate the Blur tool by pressing R on your keyboard.

When its activated, change its settings to the following:
Brush size: 150px
Hardness: 0%
Mode: Normal
Strength: 100%


The result:

Change the water’s color. To do that, click on its layer and go to Image > Adjustments > Color Balance. Once open, use the following settings:
Color Levels: -20, 0, +35
Tone Balance: Midtones
Preserve Luminosity: Checked

The resulting color should be similar to the following:

Again, let’s adjust its color, this time we will be dealing with the tones of the water’s shadows. Start by clicking on the layer again and go to Image > Adjustments > Color Balance. Once open, use the following settings:
Color Levels: -45, +25, +18 Tone Balance: Shadows
Preserve Luminosity: Checked


Now, it’s time we added the sky. Open Sunny Field by frozenstocks and once open, activate the Rectangular Marquee Tool (M).

To use this tool and select the sky, simply point and drag the mouse from one point to another. Now create a selection area over the sky on the “Sunny field” image. See image below:

Once you’ve created the selection tool, activate your Move tool (V) and drag the sky below the “water” layer. Now, after moving the sky, rename it to “sky”. Next, activate the Transform tool (Ctrl/Cmd + T) and resize it as shown below:


Next, let’s adjust the Brightness and Contrast of the sky. First, make sure that the “sky” layer is selected and then go to Image > Adjustments > Brightness/Contrast and then input the following once it opens:
Brightness: 15 Contrast: 0

Now that the sky and sea are in place, let’s now add the elements of our background. First, let’s enhance the horizon. Let’s make our horizon brighter. First, create a new layer by pressing Ctrl/Cmd + Shift + N. After doing this, a box would open – input “horizon” in the name box. Put this layer above the “sky” layer and below the “water” layer. Next, activate the Brush tool (B) and once it is open, input the following settings:
Brush size: 900px Hardness: 0% Opacity: 30% Flow: 100% #: ffffff

Note: for the Brush color, follow the instructions below:


The result should be similar to this:

Step 5: Add the BubblesAfter the horizon, let’s now add the bubbles under water. To start, make sure you’ve downloaded the brushes (Bubbles by hawksmont) and placed them on the Photoshop Brushes folder (Photoshop > Presets > Brushes). To open these brushes, simply activate the Brush tool (B) and right click on the canvas. Once you’ve done that, a contextual menu would appear.


Once you’ve done that another menu would open; click on “Load Brushes”.

Now that it is open, click on the brush set: Bubbles by hawksmont and click Open. Now you’ll see that this brush set is loaded on your brush contextual menu when you right click on the canvas. Okay, now let’s create a new layer (Ctrl/Cmd + Shift + N) and then name it “Bubbles 1”. Put this above the “water” layer. Choose the following brush from the Bubbles by hawksmont set:

After that, input the following for the Brush tool (B):
Brush size: 40px Hardness: Default Opacity: 100%
Flow: 100% #: ffffff

Activate the Brush tool (B) and input the following:
Brush size: 20px Hardness: Default
Opacity: 100% Flow: 100% #: ffffff

Now, let’s add the birds, to start open “Bird Brushes II” by lpdragonfly and load them on Photoshop. Once loaded, create a new layer and put this layer above all the layers on our canvas; name it “Birds”. Activate the Brush tool (B) and choose the following brush from the “Bird Brushes II” by lpdragonfly set:

After that, activate the Brush tool (B) again and input the following:
Brush size: 1000px Hardness: Default
Opacity: 100% Flow: 100% #: 000000

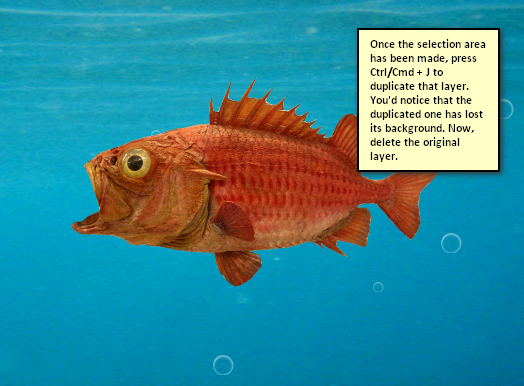
Now we’ll add our fish! To start, open “Scary Fish” by xNickixstockx. Once opened, activate the Move tool (V) and drag it to our canvas. Once in there rename this layer to “fish”.

Next, activate the Magnetic Lasso Tool (L) from the Lasso tools and create a selection area around the fish then duplicate it and erase the original layer. You’ll see that the fish was removed from its background. See image below:

Now that that’s done, let’s move on to adjusting the color of our fish to make it blend in with the water. Click on the fish’s layer and go to Image > Adjustments > Color Balance. Input the following once the box opens:
Color Levels: -27, +50, +49
Tone Balance: Midtones
Preserve Luminosity: Checked

Once finished, lower the opacity of the “fish” layer to 60% to totally blend in with the water.

Now, let’s add our other subject – the woman with a frame held in front of her head. Open the image “Model 36” by night fate stock. We would need to remove her from her background, so activate the Polygonal Lasso tool (L) and create a selection area around the model. See image below:

Once you’ve done that, activate the Move tool (V) and drag the model to our canvas. Once there, rename this layer to “model”. Next, we’re going to transform and resize the model. See image below on what size she should be resized to:

Now, let’s remove the model’s face and upper body which is within the frame. Activate the Polygonal Lasso tool (L) and create a selection area within the frame. See image below:

The result should be similar to this:

Now, let’s fix her lower body to make it blend in with the water. Activate the Polygonal Lasso tool (L) and then follow the instructions shown below:

Once you’re done with that, just erase the original lower body. Now, let’s adjust the color of the model’s lower body. Select the duplicated layer (lower body) and then go to Image > Adjustments > Color Balance and input the following:
Color Levels: -27, +50, +49
Tone Balance: Midtones
Preserve Luminosity: Checked
Next, change the lower body’s opacity to 70%. The result should be similar to this:

Now let’s erase the legs to make it look like it really is underwater. Activate the Eraser tool (E) and input the following:
Brush size: 400px
Hardness: 0%
Opacity: 75%
Flow: 100%


Create the mouthNow we’re going to add the mouth which will act as the picture inside the frame. To start, open “Mouth Detail Front” by Della Stock. Now that it is open, activate the Move tool (V) and then drag the mouth to our canvas. Position it below the “model” layer. Once there, rename it to “Mouth”. Next, we will fit this into the frame and to do that we would need to resize this layer. Activate the Transform tool and resize it as shown below:

After you’ve done that, select the mouth layer and then adjust its Brightness and Contrast. Go to Image > Adjustments > Brightness/Contrast and set the following:
Brightness: -27 Contrast: 5

Next we would need to darken the sides of the “mouth” layer to give it some shadow and make it more realistic – make it look like it really is inside the frame. Start by creating a new layer (Ctrl/Cmd + Shift + N); name this layer “Darken” and put it above the mouth layer. After that, right click on this layer to bring up the contextual menu. Once the menu is active click on “Create clipping mask”. Clipping masks make sure that the “paint” you’re going to brush in wouldn’t scatter to other layers.
Brush size: 125px Hardness: 0%
Opacity: 15%Flow: 100%


Add the texturesIn this step, we will be adding some textures to give our image a grungy feel. Let’s open the first texture: “Paper Texture 1” by Wojtar Stock. Once opened, activate the Move tool (V) and drag this to our canvas. Position it this way:

Now, transform it to this size:

Once that is done, change its Blending Mode and Opacity to the following:
Blending mode: Soft Light Opacity: 70%


Next, let’s open the “Old Paper 37 stock” by ofruin stock Move it to our canvas using the Move tool (V) and transform it to the size of our canvas.

After that, change the Blending mode and Opacity values to the following:
Blending mode: Color Burn Opacity: 50%

Step 11: Adjust the feel of our imageNow we’re going to enhance the colors of our work. Let’s start by creating a Solid Color adjustment layer. To do that, click on the Create New Fill/Adjustment layer button located on the Layer Window. See image below:

After clicking on the Solid Color adjustment layer, the Color Picker box would appear. Once it appears, input the following : 070937

Blending Mode: Exclusion Opacity: 50%
After that, create a new Solid Color adjustment layer and input the following:
#: 503929

Blending Mode: Soft Light
Opacity: 30%

Create a new Solid Color adjustment layer again, input the following:
#: d68230

Blending mode: Soft Light
Opacity: 10%

Now, let’s create a Brightness/Contrast adjustment layer from the Create New Fill/Adjustment layer button.
Once the box opens, input the following:
Brightness: -15 Contrast: -5


Now, let’s create a Gradient Map adjustment layer:
Once the Gradient Map menu opens, choose the following gradient:

Now, you’ll see that your image is Black and White, what we do now is we change the Blending mode and Opacity to the following:
Blending Mode: Color Opacity: 15%

Next, let’s create a Photo Filter adjustment layer.

When the box opens, input the following:
Warming Filter (81) Density: 25%
Preserve Luminosity: Checked

Next, let’s create a Curves adjustment layer.

When it opens, input the following:
Input: 109 Output: 135

Next, create another Solid Color adjustment layer and input the following:
#: dca145
Then use the following:
Blending Mode: Hard Light
Opacity: 40%
Finally, create another Photo Filter adjustment layer and then use the following filter:
Cooling Filter (LBB)
Density: 25%
Preserve Luminosity: Checked
The final image should be similar to this:
 Posted in: about photoshop,advance tutorials,andesta blog,CS 3,CS 4,CS 5,photo effect,Photoshop,photoshop tutorials


2 comments:
awesome!
thanks for coming...
Post a Comment