

 areyis


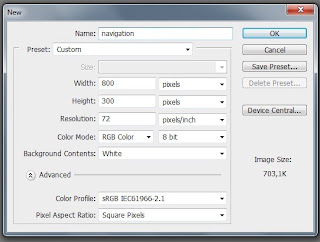
Create new document with: 800px Width and 300px Height

Let’s dublicate background layer. Go to Layer > Dublicate Layer. Rename this layer to Noise. Now go to Filter > Noise > Add Noise.
Use this options and press ok

With Rounded Rectangle tool make a fixed shape with 650px Width, 45px Height and Radius 10px

Go to Layer > Layer Style > Blending Options
For Inner Glow use next options:
Blend Mode: Overlay
Opacity: 40%
Color: #000000
Size: 4px
Opacity: 40%
Color: #000000
Size: 4px

For Gradient overlay use curent option

Gradient

Color #2a4060 Location 0%
Color #334e71 Location 12%
Color #263f64 Location 40%
Color #a6ccda Location 75%
Color #395374 Location 100%
Press ok.
For Stroke use this options

Use gradient:
Color: #ffffff Location 0% Opacity 0%
Color: #ffffff Location 100% Opacity 100%
Color: #ffffff Location 0% Opacity 0%

press ok

Now With Pressed Ctrl key in layer menu, press on the navigation thumbnail.

Go to Layer > New > Layer. Rename layer to “Left side stroke”
Go to Edit > Fill > Use: Color #ffffff. Press ok.

Now dublicate this layer.
Layer > Dublicate Layer. With Move Tool (T), move this layer with a pixel on the right. Keep active layer “left side stroke” and click on thumbnail of the layer “life side stroke copy” for it selection. Press Delete key and change Blending Mode to Overlay.
Now we can delete layer “left side stroke copy“. If you did all this steps correctly you should get similar result

Now we need to make a copy for the right side of our navigation bar.
Go to Layer > Dublicate Layer. Now Go to Edit > Transform > Flip Horizontal and drag this layer to the edge of the our navigation bar

Add text to our navigation

For text layer use Next Blending options

Make selection for our hover effect button
Go to Layer > New > Layer. Fill this layer with Radial gradient: Transparent to Black

Modify opacity to 90% and Change Blending Mode to Soft ligh
With Rectangular Marquee Tool, make selection of 1 px width and 45px height. Go to Layer > New > Layer
Fill this layer with Liniar Gradient.
Color #ffffff location 0% Opacity 0%
Color #ffffff location 50% Opacity 100%
Color #ffffff location 0% Opacity 0%

Fill this layer with this gradient and change Blending Mode to Overlay. Repeat this steps but use black in place of white.
Do the same steps and for right side of our hover effect button
 Posted in: about photoshop,andesta blog,basic photoshop,CS 3,CS 4,Photoshop,photoshop tutorials


0 comments:
Post a Comment