

 areyis

its my second time tutorial photoshop to make a christmas wallpaper or for gift card picture for party
Create a new document. Using a Layer Style, apply a Gradient Overlay, using a dark red to a black

Using the the Line Tool, let’s create two lines as shown. This will be our reference for the Christmas tree

Let’s place our Santa Claus Icon in the center of our tree. Using the Pen Tool, draw some lines like I’ve shown below. In order to do that, we need to change the way we will create our lines. Instead of using the Shape Layer, let’s choose Paths

Using the Pen Tool, let’s round our lines choosing the Convert Point Tool

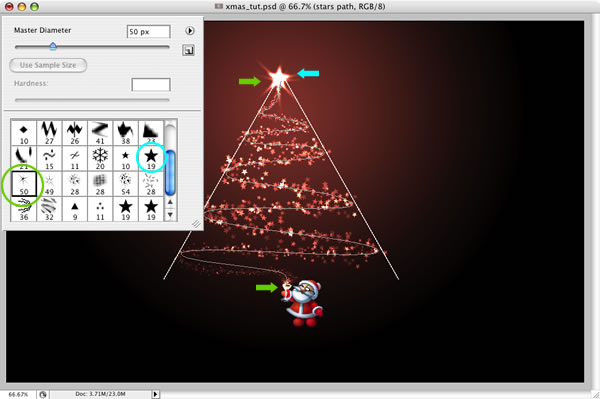
Change the Blending Mode to Color Dodge, then create a new layer inside this folder and name it “Stars path.” Next open your Brushes Palette (Window > Brushes) and select the Brush shown below

To create the star tree, make sure that you have selected the “Star path” layer. Using the Path Selection Tool (A), Ctrl-click Stroke Path. A dialog box will appear, and in there choose Brush. Make sure that the brush you created is selected

Now let’s choose another brush, and in a new layer still inside the “Star Tree” folder, let’s add some lighting effects. Select the brush shown below and paint a star over Santa’s glass
Select the “Star path” layer and double-click the layer to open the Layer Style dialog box. Select Outer Glow as shown below, and add some glow to the stars

Choose the Horizontal Type Tool (F) and type XMAS (or whatever word you would like). Double-click the layer to open the Layer Style dialog box

o create the water floor-effect, just duplicate the text layer and flip it vertically (Edit>Transform>Flip Vertical). Move it right bellow the XMAS text and apply Layer>Layer Mask>Reveal All. After that, choose the Gradient Tool (G), set the colors to black and white, and fill the mask with it

Add the Merry text and some more icons and repeat the previous step to create reflections for all of them


Let’s add a bit of snow.
- Set the colors to dark gray and black.
- Create a new layer and go to Filter>Render>Clouds.
- Apply some Gaussian Blur.
- Go to Filter>Pixelate>Mezzotint
- Add some Motion Blur
- Change the layer’s blending mode to Overlay at 30%

and its the final results "merry chritsmas"

 Posted in: about photoshop,andesta blog,basic photoshop


0 comments:
Post a Comment