next lesson we'll see how is it possible to make the wallpapers by combining several of them. We'll see also how to work with the light, increase the picture's quality and create the effect of a pressed text
Open firstly a new file: File - New
On a new window must be opened the texture of leather: File - Open (ctrl+o)
Rectangular Marquee Tool, make a copy of it: Edit - Copy(ctrl+c) and get back to the Wallpaper file to insert the copy on a new layer: Edit - Paste (ctrl+v). Correct the texture's size by using the next option: Edit - Free Transform (ctrl+t). Copy this layer:Layer - Duplicate Layer (ctrl+j) and blur out the copy with the next selection: Filter - Blur - Gaussian Blur
Change the layer's blending mode on Multiply
Layer - Merge Down (ctrl+e) and correct a little the color. First apply the next command: Image - Adjustments - Hue/Saturation (ctrl+u)
Image - Adjustments - Photo Filter
Make the picture look sharper now: Filter - Sharpen Then on two new layers you'll have to introduce the next texture
One of these layers must be turned around, firstly vertically: Edit - Transform - Flip Vertical, then horizontally: Edit - Transform - Flip Horizontal. Make use after that of the Polygonal Lasso Tool to delete those places on both layers where we have fewer fissures
Applying the same instrument, we should mark out the texture's part which will be erased carefully along the fissures line
Erase the marked place and combine the layers containing the fissures (ctrl+e)
Correct after that this layer, the copy must be blurred out (Gaussian Blur) and change the layer's type on Linear Burn. Group both layers: Layer - Create Clipping Mask (ctrl+g) and merge them down (ctrl+e)
Correct now the brightness and the contrast of the layer using Image - Adjustments - Curves(ctrl+m). Then you'll have to correct also the color's nuance and its intensiveness: Image - Adjustments - Hue/Saturation (ctrl+u)
Add the shadow: Layer - Layer Style - Blending Options
Copy this layer to be easier to work with it (ctrl+j). Mark out the background the leaf is placed on, using Select - Color Range
Copy this layer to be easier to work with it (ctrl+j). Mark out the background the leaf is placed on, using Select - Color Range
Make use of the next option: Select - Modify - Expand (5px) to erase the marked place. Insert the leaf on a new layer after that, under the layer with the fissures
Make the bright places on the leaf look brighter with the Dodge Tool
And change its color with Image - Adjustments - Color Balance (ctrl+b)
Add the shadow too: Layer - Layer Style - Blending Options
Pass to that layer containing the fissured texture and make the light parts of it look brighter too. It's possible to use the same instrument (Dodge Tool)
Select the Pen Tool to represent the necessary logotype on the next picture
Pass to the layer with the leather's texture, copy the marked place (ctrl+c) and insert it on a new layer (ctrl+v). This layer must be darker and you'll have to use for this Image - Adjustments - Curves(ctrl+m)
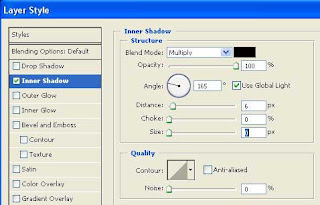
Apply the next command: Layer - Layer Style - Blending Options with the following adjustments
Combine the layers with the logotype and the leather's texture (ctrl+e). Apply then the filter to the new layer: Filter - Render - Lightness Effects
After that, correct one more time its color with the next options: Curves (ctrl+m) and Hue/Saturation(ctrl+u)
Next step includes merging down all the layers: Layer - Merge Visible (shift+ctrl+e)
Make the new picture look sharper a little. It's possible to make it this way by using Filter - Sharpen - Unsharp Mask
Choose next the Gradient Tool and dark out the picture's edges
That is what we've got


 areyis


 Posted in:


0 comments:
Post a Comment