this day im try to make a photoshop tutorial "How to make a trendy Christmas 2011 Wallpaper in Photoshop
Saturday, December 10, 2011
Thursday, December 8, 2011
How to Create Elegant Christmas Wallpaper 2011 using Photoshop
We continuously work on our promise which we have to our respected visitors and readers on the subject of Christmas designs, we spent 5 hours on this beautiful Christmas wallpaper tutorial as “How to Create Elegant Christmas Wallpaper using Adobe Photoshop CS5” get inspirations from around the famous resources and decide to work on Christmas tree design wallpaper tutorial
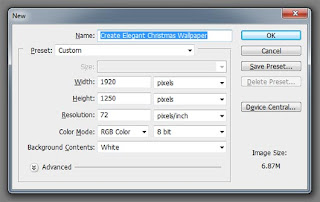
Run the Application “Adobe Photoshop CS5” and go-to File Menu and Click on New or use short key for New Document is CTRL + N, write the document name as we write in below image and add your desired screen resolution as follow we choose 1920px wide and 1250px height
Fill Radial Gradient Backgrounds with two colors foreground color # 5aa0f4 and background color # 0b3972
In this step we’re using a creative Grass brushes in the bottom and duplicate grass-layer till you get the proper result as we showing in below image
show some stars in distance view you can see in below sample image, where we using different pixels size of “soft round brush” for create shining stars view as we required these for much creative Christmas wallpaper design
As next step we are using a beautiful Adobe Photoshop Brush “Christmas brushes” as main element in this Christmas wallpaper design tutorial, and place above gradient background layer
Now we’re applying “Outer Glow Effects” on “christmas-brushes layer” with some specific settings as shown in image
Apply “drop shadow” on “christmas-brushes layer” all settings are on below image for near to finish gorgeous Christmas wallpaper tutorial.
Now choose “Character Tool” for write wallpaper title as “Merry Christmas” using free font Curlz MT Download as creative presentation of our stunning Christmas wallpapers, we using two layers with white writing and black writing title with little movement of black text layer as show an shadow effect, reference in below image:
In this stage we would like to show an sleek shine on wallpapers so we’re adding an top level layer and press ALT + DELETE to fill black color on this top layer and set Opacity as 18%
in this same step go respected visitors and readers go forward and select Eraser Tool (Press E) and select Soft Round Brush with 300 pixels and drag the Christmas area only which will show an sleek amazing shine and text writing layers should above on this black-layer then you’ll able to view beautiful Christmas wallpaper tutorial
Final Result
Monday, November 28, 2011
how to make sinterclass christmas holiday with photshop
Final Image Preview
Let’s begin by creating a new file (File>New), having 800×600 px and 72 dpi.
Next step includes applying the Rectangle Tool (U) for representing the background of the picture we want to have finally.
The layer’s parameters may be set out by clicking on the layer we work with, on the layers’ panel:
Blending Options>Gradient Overlay

Blending Options>Gradient Overlay
Gradient’s parameters:
Using the Ellipse Tool (U), it’s possible to represent the primary layer, reserved for the Santa’s portrait’s frame.
The layer’s parameters: Blending Options>Gradient Overlay
Gradient’s parameters:
Make a copy of the last made layer and select Free Transform option to make the copy smaller, applying for it the next demonstrated parameters: Blending Options>Gradient Overlay
Gradient’s parameters:

Make another copy of the same layer and choose the Free Transform option to make the copy smaller again applying for its layer the next parameters: Blending Options>Gradient Overlay
Next we’ll try to draw the Santa’s head. For the beginning we have to represent his face, choosing the Ellipse Tool (U).
Blending Options>Gradient Overlay

Gradient’s parameters:
Next step we’ll try to draw Santa’s moustache, selecting previously the Ellipse Tool (U) which is helpful when representing the first elements and then press Alt button to move off the unnecessary parts. Insert one more point on the already made picture with the Add Anchor Point Tool. The Convert Point Tool is helpful when making the necessary corrections on the element’s shape.
Blending Options>Drop Shadow

Make a copy of the last made layer and select again Free Transform option to turn over the copy, making it look exactly like below. Place the copy’s layer lower than the previous one (on the layers’ panel).
Next try to draw Santa’s eyes, taking the Ellipse Tool (U) for this operation and making for the beginning the eye’s basis of black color. Press Alt button when applying the same instrument to erase the unnecessary elements of the eyes.
Make a copy of the last made layer and place the copy as it is done on the next image:
Using the same Ellipse Tool (U), it’s possible to draw on this stage the character’s nose:
Blending Options>Gradient Overlay
Gradient’s parameters:
Next try to make several highlights of white color on the character’s nose, applying the Ellipse Tool (U) too.
Using the previous applied instrument, pass to representing Santa’s eyebrow of white color too, as the moustache is.
Make a copy of the last made layer and select after that the Free Transform option to turn over the copy and place it the way indicated on the next picture:
Both layers containing the eyebrows have the same layer’s parameters: Blending Options>Drop Shadow
It’s time to insert on the picture Santa’s hat, applying in this case the Pen Tool (P) and the color #E92225. The Convert Point Tool will be helpful in making appropriate corrections on the element’s shape. Place this layer lower than Santa’s face (on the layers’ panel).
Saturday, November 26, 2011
how to make christmas wallpaper 2012 with Photoshop
its my second time tutorial photoshop to make a christmas wallpaper or for gift card picture for party
Create a new document. Using a Layer Style, apply a Gradient Overlay, using a dark red to a black


 ar3y
ar3y


